How to Convert HTML to W3CMS
Table of Contents
- Step 1: Prerequisites
- Step 2: Create Your Theme Folder
- Step 3: Create Necessary Theme Files
- Step 4: Copy CSS, Images, and JavaScript (JS) Folders
- Step 5: Activate a W3CMS Theme
- Step 6: Convert HTML Code into Header, Index, and Footer
- Step 7: Configuring CSS, JavaScript and Images
Step 1: Prerequisites
I hope you already have W3CMS installed on your localhost, such as XAMPP (i.e., on your computer). If not, don’t worry! We’ve covered a detailed guide that will help you install and set up W3CMS locally. Be sure to check it out before proceeding!
Step 2: Create Your Theme Folder
Folder Structures –

There are two ways to create a theme folder in W3CMS.
Method 1: Using the Command Line
You can create a theme folder using the command:
php artisan theme:make
This command will automatically generate the necessary directories, such as public, resources/views, and the composer.json file.
If you choose to use the theme:make command, follow these steps:
- Theme Name:(Enter the theme name of your choice)
- Vendor Name:(Typically, this is the name of the frontend vendor)
- Author Name:(Enter the author’s name for the theme)
- Description:(Provide a brief description of the theme)
- Version:(Specify the version of the theme)
- Is it a child theme? [no]:(Type
yesorno)- If you select yes for a child theme, you’ll be prompted to enter the following:Parent Theme Name:(Enter the name of the parent theme)
By following these steps, you can successfully create a new theme folder tailored to your needs.
Method 2: Creating a Theme Manually
If you prefer not to use the command line, you can create the theme manually by directly setting up the necessary folders and files within the theme folder.
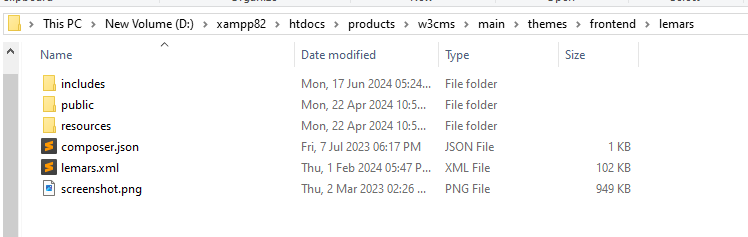
For example, if the theme name is test_theme, follow these steps:
- Create the Theme Folder:
- In the
frontendfolder of the themes directory, create a new folder namedtest_theme.
- In the
- Create Necessary Subfolders:
- Inside the
test_themefolder, create the following subfolders:publicresources- Within the
resourcesfolder, create aviewsfolder.
- Within the
- Inside the
These folders are essential for your theme’s structure. In the following steps, we will provide details about the necessary files to include within these folders. By organizing your theme this way, you ensure that it adheres to the W3CMS standards and is ready for development.
Step 3: Create Necessary Theme Files
The newly created theme folder is currently empty, and you’ll need to add some essential files to make it functional. Below are the necessary files to create:
1. composer.json
If you created the theme using the command line, the composer.json file would be generated automatically. However, if you’re creating the theme manually, you must create the composer.json file in the root folder of the theme. Here’s an example of what it should look like:
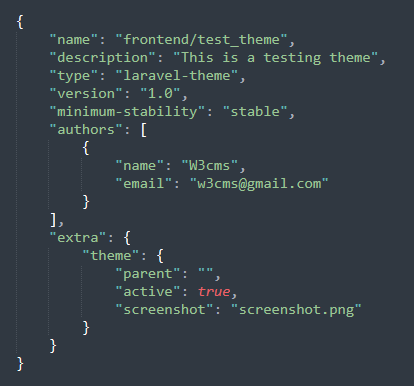
Note: Don’t forget to include the theme name (as the folder name) after frontend, as shown in the example above.
2. Screenshot.png
To add a banner for the theme in the admin panel, you need to include an image file in your new theme folder. The image size should be 1200 by 900 pixels, and the file name should be Screenshot.png (in PNG format).
3. Includes Directory
Create an includes directory in the root of your newly created theme folder. This directory will be used in later steps for additional theme files and functionalities.
By setting up these files and directories, you’ll be well on your way to making your theme functional and ready for development!
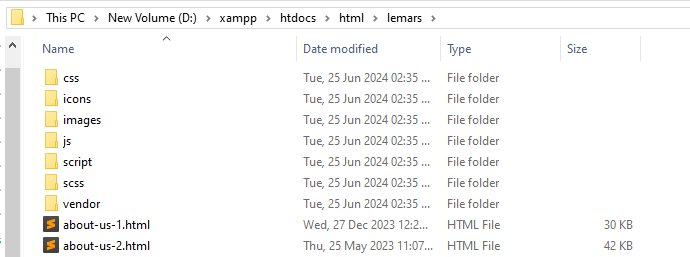
Step 4: Copy CSS, Images, and JavaScript (JS) Folders
From your HTML theme, copy the assets folder, which includes subfolders for CSS, JS, and images, to the public folder of your new W3CMS theme.
Steps to Move the Assets:
- Locate the assets folder in your existing HTML theme.
- Copy the entire assets folder, which typically contains:
- CSS: For stylesheets.
- JS: For JavaScript files.
- images: For image assets.
- Paste the copied assets folder into the
publicfolder of your new W3CMS theme.
Resulting Structure
After moving the assets to your new W3CMS theme’s public folder, the structure will look like this:
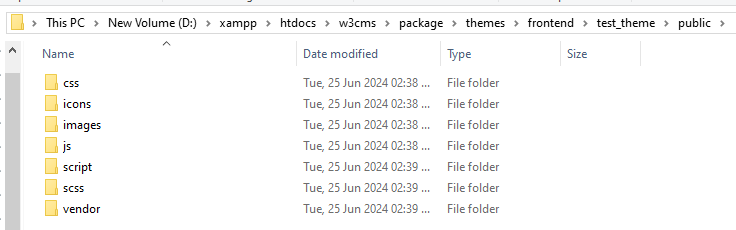
This organization ensures that your theme has access to all the necessary assets for styling and functionality, making it ready for further development.
Also Read: Top Web Development Technologies: Future-Proof Your Website
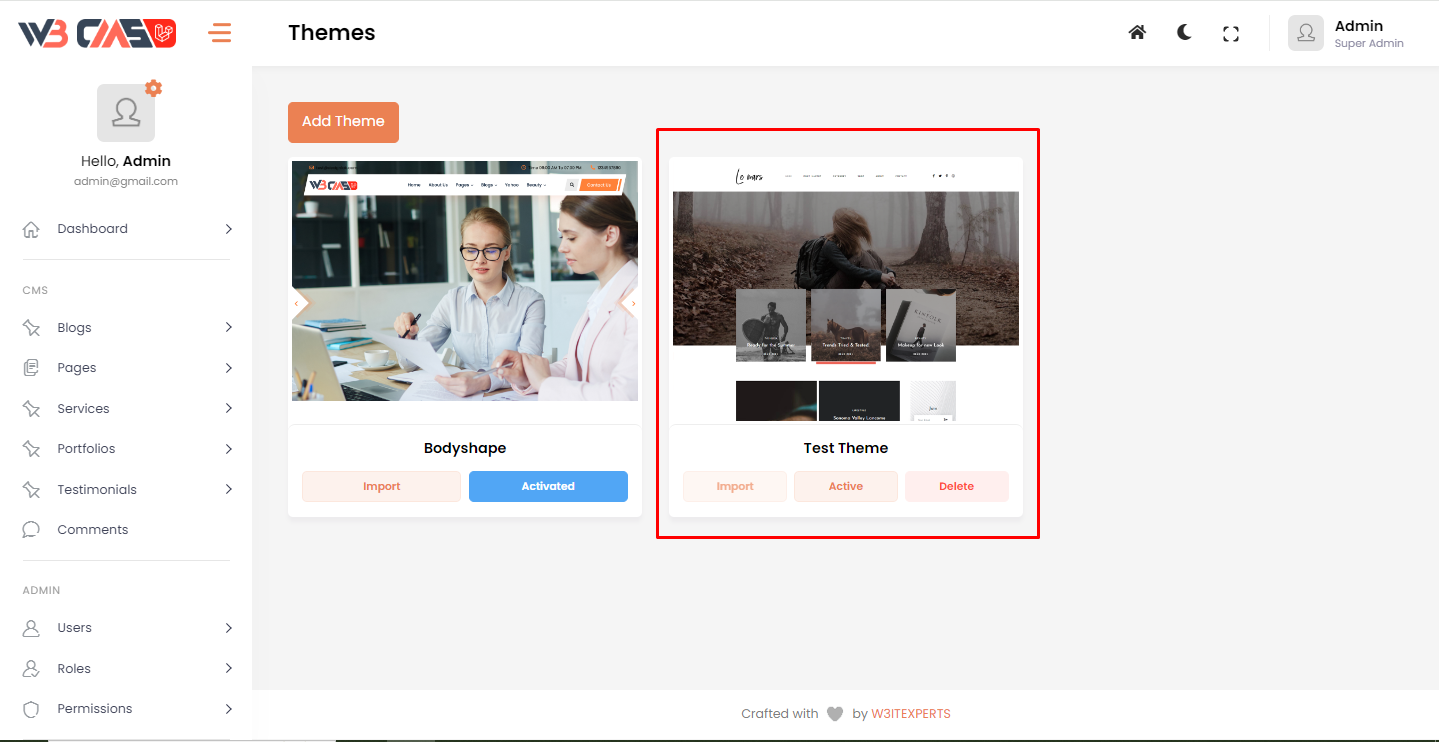
Step 5: Activate a W3CMS Theme
Now that you have added the essential folders required for any W3CMS theme, it’s time to activate your theme. Follow these steps:
- Open Your W3CMS Site: Launch your web browser and navigate to your W3CMS site.
- Log in to the Admin Dashboard: Enter your credentials to access the Admin Dashboard.
- Navigate to Appearance > Themes: In the dashboard, go to the Appearance section and click on Themes.
- Locate Your New Theme: If you followed the previous steps correctly, you should see your new theme listed in this section.
- Activate the Theme: Click on the Activate button next to your theme. Once activated, the theme will be live on your site.
However, keep in mind that the theme won’t function fully just yet. You still need to add the necessary blade files to display content. In the next steps, we will detail how to convert your HTML into a W3CMS Laravel theme.
Step 6: Create necessary files and directories for views
Before proceeding further, let’s ensure that a crucial setting is configured in your admin panel. Navigate to Configuration > Reading and confirm that the Show on front option is set to Post. This setting ensures that the index.blade.php file opens as the landing page of your site.
Next, we need to create the necessary view blade files in the views folder of the resources directory within your theme. Create the following files:
archive.blade.phpauthor.blade.phpcategory.blade.phpcontact.blade.phpindex.blade.phppage.blade.phpsearch.blade.phpsingle.blade.phptag.blade.php
These files will initially be empty, as we will add the code later. First, let’s set up a layout and incorporate it into the index.blade.php file to check if everything is functioning correctly.
Layout Setup
- Create Layouts Directory:
- In the
viewsfolder of theresourcesdirectory, create a new folder namedlayouts.
- In the
- Create Default Layout File:
- Inside the
layoutsfolder, create a file nameddefault.blade.phpfor the default layout. If your theme requires multiple layouts, you can create additional layout files as needed.
- Inside the
- Copy HTML Content:
- Open the
index.htmlfile from your downloaded HTML theme, and copy all the content from<!DOCTYPE html>to the closing</html>tag. - Paste this content into the
default.blade.phpfile in your newly created theme’slayoutsfolder.
- Open the
- Add the Default Layout to index.blade.php:
- Now, include the default layout in the
index.blade.phpfile by adding the following line at the top:
@extends('layouts.default')Make sure to add the path correctly. - Now, include the default layout in the
- Run the Package:
- After making these changes, run the package and check your theme. Your theme should now display correctly!
By following these steps, you’ll have set up the necessary view files and a layout for your W3CMS theme, ensuring it’s ready for further development.
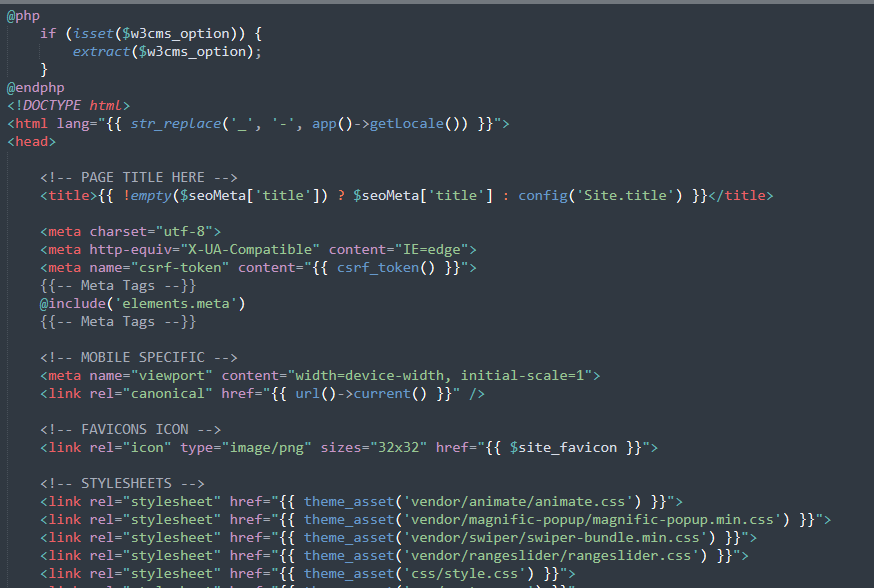
Step 7. Configuring CSS, JavaScript and Images
Now your theme looks weird because the CSS and JS files are not applied to the theme. You need to call these CSS, JS, and image files to complete the look of the theme.

There is a very simple way to do this. Anywhere you use any asset link, like for CSS, JS, or images, you only need to add this asset path in a function called theme_asset(). This function looks like this:

Also, do this for images and JS files.
The theme_asset() function is used to get the current theme’s public directory path. It will concatenate the current path with the respective file. For example, the path of the CSS file is defined as follows: theme_asset('vendor/bootstrap-select/bootstrap-select.min.css').
Use the theme_asset() function for images, CSS, and JS files, and add other functions like the one shown in the image.
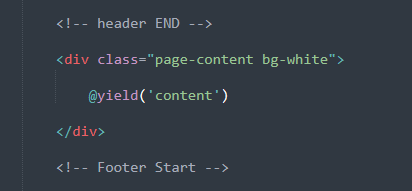
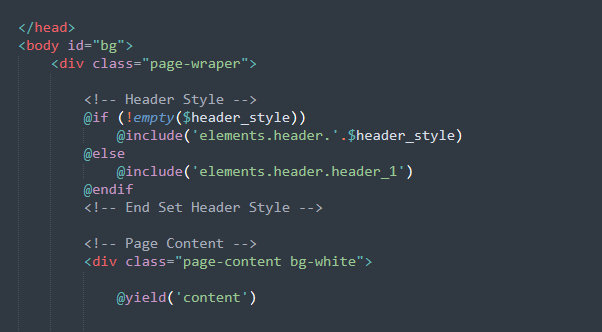
Next, remove the main content from this layout. Instead, use the @yield('content') function in its place. This function will automatically add content at the designated spot when we call the layout using the @extends() function in the Blade files or necessary pages.
Header:
Before adding the header to the layout, create a W3Options directory inside the includes folder of the newly created theme. In the W3Options directory, create a file named theme-options-data.php. This file will be used to store information about your theme. In this file, add the _header_style_options() function (as shown in the image below), which will contain an array defining how many headers your theme has.
In this array, you will define the name (as the header style) in the img_param title and assign a unique ID for each header. Please ensure that your array maintains the same structure as illustrated in the image. Some parameters in the array are used to configure various features.

For example, if you have a second header, you should add another array with id => header_2 in the $header_styles array. These IDs will be crucial for creating the corresponding header files.
Now, in the views folder, create an elements directory (if it doesn’t already exist). Inside the elements directory, create a header folder. In this folder, create header files using the IDs defined in the _header_style_options() function. For instance, if the ID is header_1, create a file named header_1.blade.php. If you have multiple headers, create additional files for each header.
Finally, include the header in the default layout at the location where the header code is intended to be placed, as demonstrated in the image.
Navbar Menu:
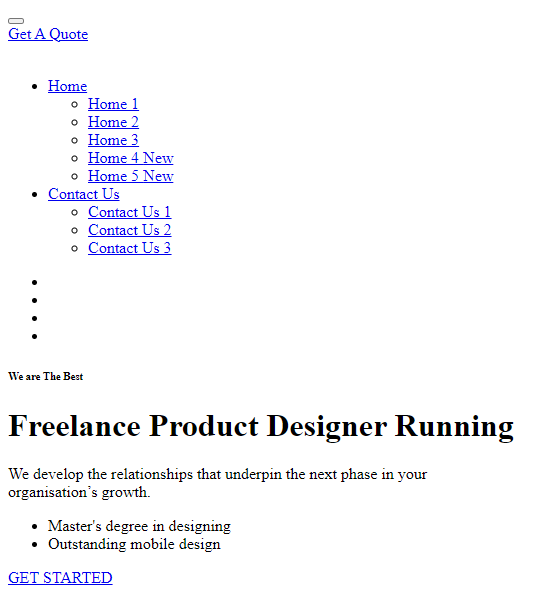
When you visit the site, you may notice that the menus are not displayed dynamically. To fix this, you need to add the following line of code in the header.blade.php file or any other file where the navigation menu is required:
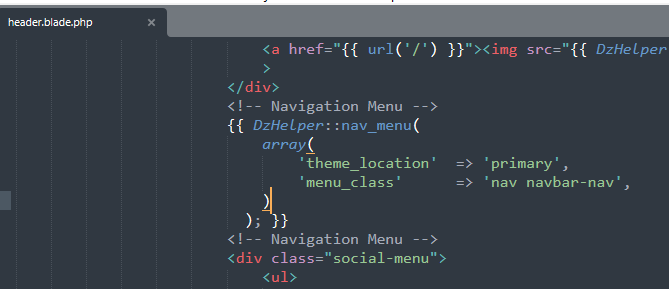
Now, create a nav_menu.blade.php file within the elements folder of the newly created theme. This file should contain dynamic code that incorporates the HTML structure of the navigation menu from your downloaded theme. The code in this file will render the menu dynamically, ensuring that it reflects the correct items based on your site’s structure and settings.
Make sure to follow the design and layout specified in your theme while implementing the menu code to maintain consistency across the site.

Footer:
For the footer, follow a similar process as you did for the header. Inside the theme-options-data.php file located in the W3Options directory, add the _footer_style_options() function. This function will define how many footer styles your theme includes.
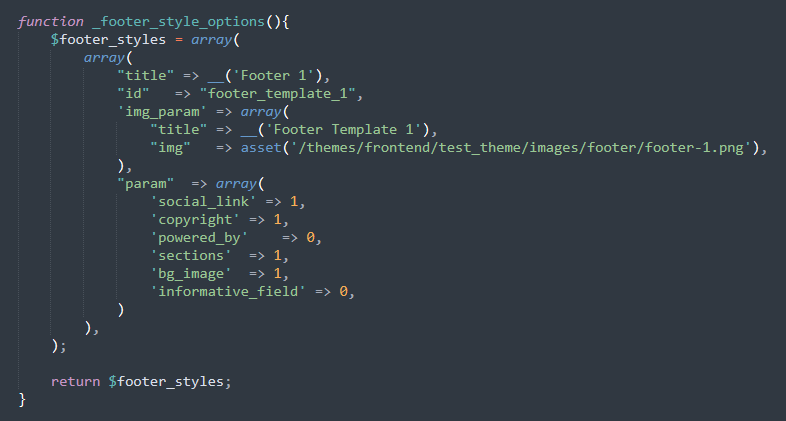
Next, create a footer folder within the elements directory. In this folder, create footer files based on the IDs defined in the _footer_style_options() function. For instance, if one of the IDs is footer_template_1, create a file named footer_template_1.blade.php.
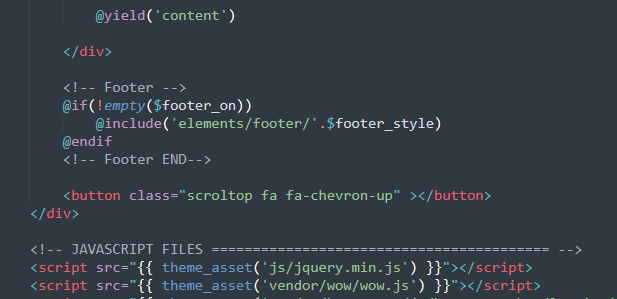
After creating the footer files, include the footer in the default layout where the footer code is placed. This ensures that the correct footer will be displayed throughout your theme.
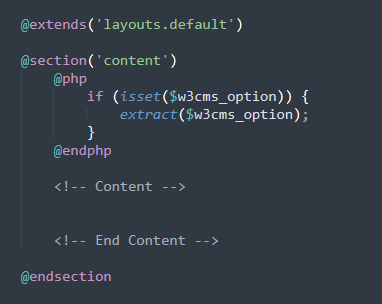
index.blade.php:
This file has been used to show a list of blogs in W3CMS, and the code is similar to other files like archive.blade.php, author.blade.php, category.blade.php, tag.blade.php, and search.blade.php. In previous steps, we will see how to set up layouts and elements in this file.
Now we will add the necessary content for this file. The layout is already attached by the @extends('layouts.default') function.
Now add a @section('content') and @endsection function that puts our code in place of the @yield('content') function in the default layout. In the section function, add the extract function to extract the array of theme options into variables, like in the image below.
These are some common things that are similar in every theme of W3CMS in the index file, but after this, we will go to the design level part that is maybe different in themes, like how to set sidebars, listings, and banners.
Banner:
If your theme has a common banner that is used on every page for showing titles or other information, then create a file named banner-inner.blade.php in the elements folder. This banner file will contain configurations for the banner.
We don’t include banners in the post detail page. However, if a user has a banner in the post detail as part of the theme design, the user can include the banner in the posts.
Sidebar and Widgets:
Before creating the sidebar, we need to create the widgets first. W3CMS has some default widgets like Search, Recent Posts, Categories, Tags, etc. To use these widgets, it is necessary to create widget view files in W3CMS.
So, create a folder named w3elements in the views directory. Inside w3elements, create a widgets folder, and within this folder, create the following files:
archives.blade.phpcategories.blade.phprecent_posts.blade.phpsearch.blade.phptags.blade.php
After configuring these files, create widgets in the admin panel’s Widgets section, and the widgets will be shown in the All Widgets section inside Widgets. If a user wants to create more widgets, they can add an element’s array with the necessary fields in the ElementsClass.php file located under the newly created theme’s includes -> MagicEditor directory.
In W3CMS, we call the sidebar a block, and my HTML theme has a sidebar that has left and right positions on the page (as per the Theme Options setting). So, create a block with the type sidebar in the admin panel inside the Widgets section. Then, add the necessary widgets inside this block by dragging and dropping them from All Widgets.
Next, go to the Page General Settings inside the theme options in the admin panel. Under Sidebar Setting, there is a Select Sidebar option; choose your newly created sidebar here and save the theme options.
We have successfully created a sidebar in the admin panel, but we need to configure the sidebar file to display it in the index file. Now, create a file named sidebar.blade.php in the elements directory. Include this file in the index file, as your theme’s design conditions may vary. For my design, I include the sidebar two times like this:
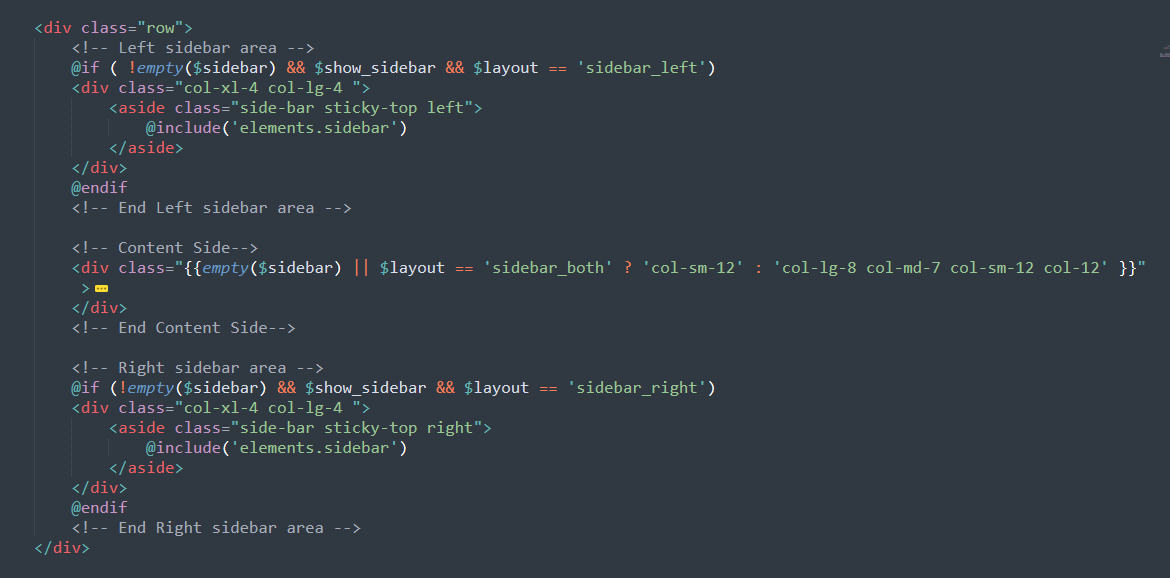
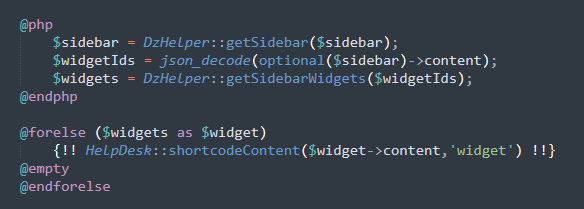
In the sidebar file, there is a loop of widgets from the currently chosen block. The sidebar file looks like this…
Post Listing:
My listing content is located in a <div> with the class section-full. Inside this section-full <div>, there is a row containing two columns: one for the sidebar (as previously mentioned with the code structure) and the second for the listing items. In the listing column, I have another row for the listing items. Here, we include the post listing file.
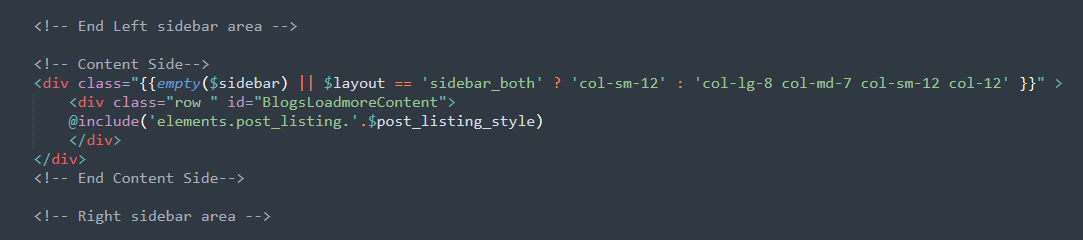
By default, W3CMS has two different types of listings: grid and list, which can be chosen from the admin theme options settings. The ID post_listing_1 is used for the grid layout, while post_listing_2 is used for the list type. Similar to the header, the post listing also has view files named after these IDs.
Now, create a directory named post_listing and within this directory, create the listing files by their respective IDs:
- post_listing_1.blade.php
- post_listing_2.blade.php
In all the themes, everywhere we want to show a list, we use this post listing file by including it in the relevant blade files. This approach allows for a consistent display of posts across the website, utilizing post_listing_1.blade.php for grid layouts and post_listing_2.blade.php for list layouts, based on the selected layout option in the admin theme settings.